Raspberry pi 2 + Rasbian OS 4.4
Raspberry piのファームウェアアップデートで、カーネルがアップデートされていました。これまでのバージョン4.1から、4.4に変わっているそうです。
pi@raspberrypi:~$ sudo rpi-update
 *** Raspberry Pi firmware updater by Hexxeh, enhanced by AndrewS and Dom
 *** Performing self-update
 *** Relaunching after update
 *** Raspberry Pi firmware updater by Hexxeh, enhanced by AndrewS and Dom
#############################################################
WARNING: This update bumps to rpi-4.4.y linux tree
Be aware there could be compatibility issues with some drivers
Discussion here:
https://www.raspberrypi.org/forums/viewtopic.php?f=29&t=144087
##############################################################
Would you like to proceed? (y/N)
pi@raspberrypi:~$ packet_write_wait: Connection to 192.168.10.104: Broken pipe
MacBook-Air:~ WindVoice$
ここで表示されているURLの議論を読んでみたところ、ドライバモジュールがいくつかカーネルの標準としてロードされるようになったため、ifconfigの表示が変わっているとか話題になっているようです。
この議論自体はトラブルというほどではないのですが、こんな時は何かといろいろ起こるものなので、一応バックアップを取ってからアップデートすることにしました。今回はMacを使ってRaspberry piのバックアップイメージを作成しておきます。参考にしたのは別の方が書いているこちらのブログ。
まずはRaspberry piの電源を切って、SDカードを抜きます。
pi@raspberrypi:~$ sudo poweroff

Broadcast message from root@raspberrypi (pts/0) (Sun Apr 17 09:59:35 2016):
The system is going down for system halt NOW!
pi@raspberrypi:~$ Connection to pi closed by remote host.
Connection to pi closed.
MacBook-Air:Documents WindVoice$
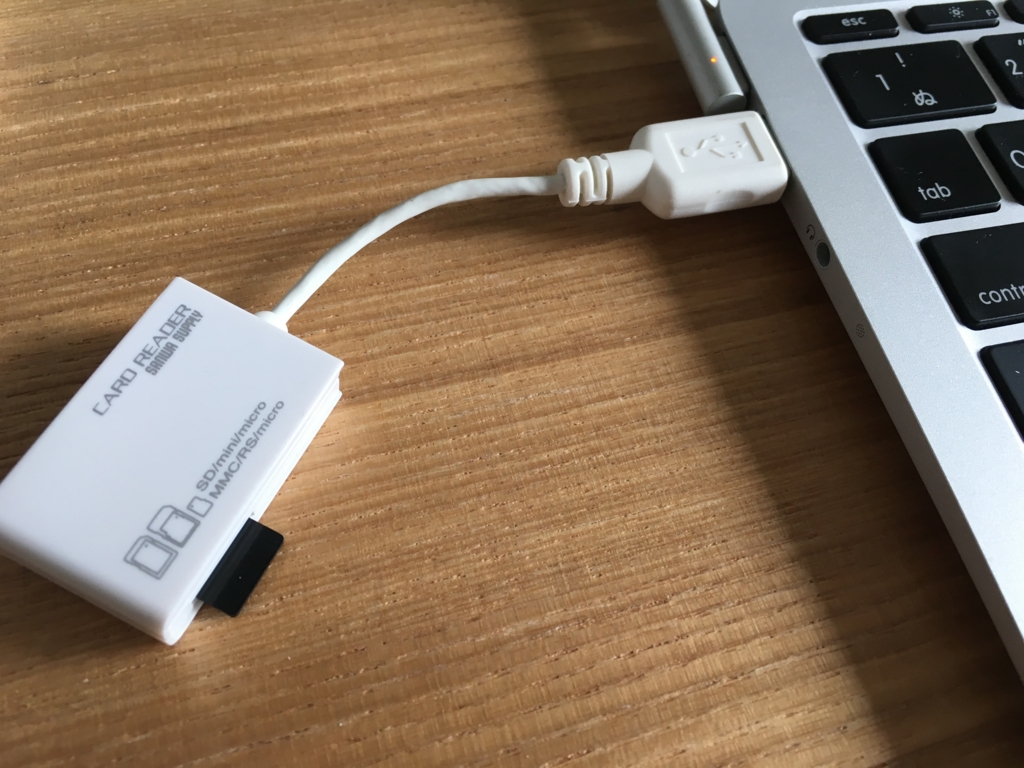
Macbook AirにカードリーダをつないでSDカードを接続します。

dfコマンドで確認すると、接続前後でデバイスが増えた(/dev/disk2s1)ことがわかります。スライス1(s1)がマウントされていますが、イメージを取得するのはdisk2を丸ごととることになります。
MacBook-Air:Documents WindVoice$ df -k
Filesystem    1024-blocks     Used Available Capacity  iused   ifree %iused  Mounted on
/dev/disk1      117286912 84366624  32664288    73% 21155654 8166072   72%   /
devfs                 180      180         0   100%      624       0  100%   /dev
map -hosts              0        0         0   100%        0       0  100%   /net
map auto_home           0        0         0   100%        0       0  100%   /home
MacBook-Air:Documents WindVoice$ df -k
Filesystem    1024-blocks     Used Available Capacity  iused   ifree %iused  Mounted on
/dev/disk1      117286912 84366468  32664444    73% 21155615 8166111   72%   /
devfs                 183      183         0   100%      636       0  100%   /dev
map -hosts              0        0         0   100%        0       0  100%   /net
map auto_home           0        0         0   100%        0       0  100%   /home
/dev/disk2s1        57288    28240     29048    50%      512       0  100%   /Volumes/boot
MacBook-Air:Documents WindVoice$
デバイスがわかったら、ddコマンドを使ってカードのイメージを取得します。
MacBook-Air:Documents WindVoice$ sudo dd if=/dev/disk2 of=/Users/WindVoice/RPI.img
Password:
しばし待ち…… ますが…… お、遅い…… ddコマンドは昔から使われているコマンドなのですが、進捗状態がわからないのが困ったところです。プログレスパーを出したりできないのかな。とりあえず一回止めて様子を見ることにしました。
MacBook-Air:Documents WindVoice$ sudo dd if=/dev/disk2 of=/Users/WindVoice/RPI.img
Password:
^C15615816+0 records in
15615816+0 records out
7995297792 bytes transferred in 1735.946011 secs (4605730 bytes/sec)
MacBook-Air:Documents WindVoice$
4605730bytes/secとありますので、だいたい4.5MB/秒の転送速度です。ddコマンドのbsオプションで速くならないか試してみたのですが、ほぼ変わらず。カードか、またはカードリーダの性能でこのくらいになってしまうようです。16GBのカードを使用しているので約1時間かかります。
MacBook-Air:Documents WindVoice$ sudo dd if=/dev/disk2 of=/Users/WindVoice/RPI.img bs=8192
1901568+0 records in
1901568+0 records out
15577645056 bytes transferred in 3360.981520 secs (4634850 bytes/sec)
MacBook-Air:Documents WindVoice$ diskutil umountDisk /dev/disk2
Unmount of all volumes on disk2 was successful
MacBook-Air:Documents WindVoice$
SDカードのイメージには未使用の領域も含まれているため、圧縮すると大幅にコンパクトにすることができます。gzipで圧縮しておきます。記録されているデータの内容にもよるのですが、今回は半分以下のサイズにすることができました。
MacBook-Air:~ WindVoice$ ls -l RPI.img
-rw-r--r--  1 root  staff  15577645056  4 17 11:41 RPI.img
MacBook-Air:~ WindVoice$

MacBook-Air:~ WindVoice$ ls -l RPI.img.gz
-rw-r--r--  1 root  staff  6337548426  4 17 11:41 RPI.img.gz
MacBook-Air:~ WindVoice$
SDカードを戻して電源を入れて、updateを実行。アップデート前のバージョンは4.1.21です。
MacBook-Air:Documents WindVoice$ ssh pi@pi
pi@pi's password:
Linux raspberrypi 4.1.21-v7+ #872 SMP Wed Apr 6 17:34:14 BST 2016 armv7l

The programs included with the Debian GNU/Linux system are free software;
the exact distribution terms for each program are described in the
individual files in /usr/share/doc/*/copyright.

Debian GNU/Linux comes with ABSOLUTELY NO WARRANTY, to the extent
permitted by applicable law.
Last login: Sun Apr 17 00:49:57 2016 from 192.168.10.106
pi@raspberrypi:~$

pi@raspberrypi:~$ sudo rpi-update
 *** Raspberry Pi firmware updater by Hexxeh, enhanced by AndrewS and Dom
 *** Performing self-update
 *** Relaunching after update
 *** Raspberry Pi firmware updater by Hexxeh, enhanced by AndrewS and Dom
#############################################################
WARNING: This update bumps to rpi-4.4.y linux tree
Be aware there could be compatibility issues with some drivers
Discussion here:
https://www.raspberrypi.org/forums/viewtopic.php?f=29&t=144087
##############################################################
Would you like to proceed? (y/N)
 *** Downloading specific firmware revision (this will take a few minutes)
  % Total    % Received % Xferd  Average Speed   Time    Time     Time  Current
                                 Dload  Upload   Total   Spent    Left  Speed
100   168    0   168    0     0    213      0 --:--:-- --:--:-- --:--:--   284
100 50.2M  100 50.2M    0     0   547k      0  0:01:33  0:01:33 --:--:--  133k
 *** Updating firmware
 *** Updating kernel modules
 *** depmod 4.4.7-v7+
 *** depmod 4.4.7+
 *** Updating VideoCore libraries
 *** Using HardFP libraries
 *** Updating SDK
 *** Running ldconfig
 *** Storing current firmware revision
 *** Deleting downloaded files
 *** Syncing changes to disk
 *** If no errors appeared, your firmware was successfully updated to 1e84c2891c1853a3628aed59c06de0315d13c4f1
 *** A reboot is needed to activate the new firmware
pi@raspberrypi:~$
アップデートが無事終わったので再起動です。
pi@raspberrypi:~$ sudo reboot

Broadcast message from root@raspberrypi (pts/0) (Sun Apr 17 12:00:33 2016):
The system is going down for reboot NOW!
pi@raspberrypi:~$ Connection to pi closed by remote host.
Connection to pi closed.
MacBook-Air:Documents WindVoice$ ssh pi@pi
pi@pi's password:
Linux raspberrypi 4.4.7-v7+ #876 SMP Tue Apr 12 22:28:41 BST 2016 armv7l

The programs included with the Debian GNU/Linux system are free software;
the exact distribution terms for each program are described in the
individual files in /usr/share/doc/*/copyright.

Debian GNU/Linux comes with ABSOLUTELY NO WARRANTY, to the extent
permitted by applicable law.
Last login: Sun Apr 17 02:52:43 2016 from 192.168.10.106
pi@raspberrypi:~$
ログイン直後のメッセージから、確かに4.4.7に変更されたのが確認できました。リモートデスクトップ接続など、基本的な機能は特に問題なく動いています。Raspberry piのコミュニティではIPv6が設定していないのに起動しているとか書いてありましたが、私のところではそんな面白い(?)ことは発生していません。残念。何か違いを感じるようなことがあればまた書こうと思います。
Raspberry pi + gamepad (XBOXコンントローラー)で画面表示
前回の続きで、ゲームパッドの各ボタンの状態を読み取るサンプルプログラムを作っていきたいと思います。ゲームパッドは、前回と同じくxboxコントローラです。

ボタンの種類
私の手元にはxboxのコントローラがあるので、これを使う前提で書きますが、ゲームパッドには性質が異なるボタンがいくつもあり、それぞれデータの取り方が変わります。以下、各ボタンの名前と位置は公式サイトに説明がありますのでこれを見ながら説明します。
ジョイスティック(軸:axis)
まず、ジョイスティック。よくキャラクタを動かしたり(右スティック)、カメラ視点を移動する(左スティック)のに使われます。すべての方向に、わずかな傾きも検出できます。プログラム的にはどんな仕組みでできているのかというと、ジョイスティックの状態を、左右方向、上下方向にそれぞれ-1から1までの少数値で取得することができます。
つまり、スティックを上方向に完全に倒すと、上下方向のデータが-1になり、下方向に完全に倒すと1になります。半分だけ倒せば0.5になります。スティックに触れない状態は0です。左右方向も同様です。xboxコントローラのジョイスティックは押し込む動作も可能ですが、これはあとで説明するボタンの一種として扱われています。
ところで、ジョイスティックとは書きましたが、プログラムの中では「軸(axis)」と呼ばれます。そして、左右の人差し指で押すボタン(LTとRT)も、押し込みの強さによって強弱をつけることができるので、軸の一種として扱われています。結局、合計6個のデータが取れることになります。順番は右スティック左右、右スティック上下、LT、左スティック左右、左スティック上下、RT、の順です。
ボタン
ボタンの仕組みは説明不要と思います。プログラム的には、押されている(1)、押されていない(0)の二値データとして取得することができます。データは配列として取得できるのですが、順番はA、B、X、Y、LB、RB、Back、Start、ガイドボタン、左スティックを押す、右スティックを押す、 の順です。
ハットスイッチ
ハットスイッチというのは、あまり聞きなれない用語なのですが、飛行機の操縦桿で、スティックの上についている小さなボタンのことを言うのだそうです。xboxコントローラでは、方向パッドがこれに当たります。上下方向で1データ、左右方向で1データとなっていて、-1, 0, 1の3種類の値を取得できます。
悩ましいのはデータの示す意味で、ジョイスティックとは逆に、上が押されていると1、下が押されていると-1になります。右は1、左は-1です。
プログラムの仕組み
プログラムの要素としては、ゲームパッドからデータをとる部分と、取れたデータを画面に表示する部分、という大きく2つの要素があります。前回に引き続き、pygameというモジュールを使います。
ゲームパッドのデータの取り方
pygameモジュールでは、ゲームパッドの状態の変化をイベントという形で取得できます。イベントが発生していれば何らかの操作が行われたということなので、ゲームパッドの状態を確認して、それをゲーム内の動作に反映することになります。
whileループが無限に繰り返される部分を作り、イベント発生の有無を取得、イベントがあれば取得した値を画面に表示します。
画面表示
pygameにはゲーム画面を操作するための仕組みも含まれています。ごく初歩的な部分だけですが、このサンプルでも使ってみています。ゲーム画面は「パラパラマンガ」的な仕組みで動いています。つまり、まずある1つの画面(静止画)を描画して、それをウインドウに表示、次に少しだけ変化した画面を描画して、それを前の画面と置き換え…… というように。
画面をプレイヤーに見せながら書き換えると、書き換え途中の画面が見えてしまうため、全体にチラチラして見づらくなります。そこで、データ的には2画面分を用意しておき、そのうち1つの画面を表示させ、その「裏」で次の画面を描画し、描画が終わったら「パラッ」と差し替える(flip)という操作をします。ダブルバッファリングという手法です。
数値をテキストとして表示するのですが、これは表示する場所を座標として指定して、文字をレンダリングする、という手順になります。
サンプル
さて、そんなわけで作ってみた動作確認のためのプログラムが以下です。
pi@raspberrypi:~/gamepad$ cat gamepaddemo.py
#!/usr/bin/python
# -*- coding: utf-8 -*-
import sys
import os
import pygame
from pygame import locals
import time

# 初期化
pygame.init()
pygame.joystick.init()

# ゲームパッドを認識しているか?
if pygame.joystick.get_count() == 0:
	print "ゲームパッドがありません。"
	sys.exit("終了")
else:
	print "ゲームパッドが" + str(pygame.joystick.get_count()) + "個見つかりました。"

# 最初の一個だけ初期化
joystick = pygame.joystick.Joystick(0)
joystick.init()

# ゲームパッドは6軸11ボタン
n_ax = joystick.get_numaxes()
n_bu = joystick.get_numbuttons()
n_ha = joystick.get_numhats()

# 800x600のウインドウを用意する
size = width, height = 600, 400
black = 0, 0, 0
screen = pygame.display.set_mode(size)
pygame.display.set_caption("gamepad demo")
os.environ['SDL_VIDEO_WINDOW_POS'] = str(0) + "," + str(0)

# フォント
font = pygame.font.Font(None, 30)

# 状態データの保管場所
axis   = [0.0, 0.0, 0.0, 0.0, 0.0, 0.0]
button = [0, 0, 0, 0, 0, 0, 0, 0, 0, 0, 0, 0, 0]
hat    = [0, 0]

# 軸は左親指の左右、上下、左中指、右親指の左右、上下、右中指
axispos   = [ ( 10,150), ( 90,150), (170,150), (250,150), (330,150), (410,150)]

# ボタンは順に、A, B, X, Y, LB, RB, Back, Start, xboxガイドボタン、
# 右スティック押し込み、左スティック押し込み
buttonpos = [ ( 30,200), ( 50,200), ( 70,200), ( 90,200), (110,200),
              (130,200), (150,200), (170,200), (190,200), (210,200),
              (230,200) ]

# ハットスイッチ
# いわゆる十字ボタンのこと。左右、上下で二つデータがある。
# 左または下が押されると-1、右または上が押されると1になる。
# 上下が不自然な仕様になっている。
hatpos    = [ ( 30, 250), ( 50, 250) ]

# ここから無限ループ
while 1:
	# ゲームパッドのイベントを確認する
	event = False
	for e in pygame.event.get():
		event = True
		if e.type == pygame.locals.JOYAXISMOTION:
			# 軸
			for a in range(6):
				axis[a] = joystick.get_axis(a)
		elif e.type == pygame.locals.JOYBUTTONDOWN or e.type == pygame.locals.JOYBUTTONUP:
			# ボタン
			for b in range(11):
				button[b] = joystick.get_button(b)
		elif e.type == pygame.locals.JOYHATMOTION:
			# ハットスイッチ(十字ボタン)
			hat[0], hat[1] = joystick.get_hat(0)

	if event == False:
		# 100分の1秒だけスリープする。CPUの利用率がこれでかなり下がる。
		time.sleep(0.01)
		continue

	# 画面更新の準備。まずは真っ暗なスクリーンを用意。
	screen.fill(black)

	# 軸の情報を表示
	for a in range(6):
		label = font.render("%+5.3f" % ( axis[a] ), 1, (225,225,225))
		screen.blit(label, axispos[a])

	# ボタンの情報を表示
	for b in range(11):
		if button[b] == 0:
			label = "-"
		else:
			label = "*"
		label = font.render(label, 1, (225,225,225))
		screen.blit(label, buttonpos[b])

	# ハットスイッチの情報を表示
	for h in range(2):
		label = font.render("%d" % ( hat[h] ), 1, (225, 225, 225))
		screen.blit(label, hatpos[h])

	# 描画を切り替える
	pygame.display.flip()

pi@raspberrypi:~/gamepad$
動作している様子を撮影したのが下の動画です。ところどころピントが合っていなくて申し訳ないですが、雰囲気はつかんでもらえると思います。動画の取り方ももう少し覚えないといけませんね。
youtu.be

マイクロソフト有線 ゲーム コントローラーXbox 360 Controller for Windows リキッド ブラック 52A-00006
- 出版社/メーカー: マイクロソフト
- 発売日: 2011/04/20
- メディア: Personal Computers
- 購入: 29人 クリック: 106回
- この商品を含むブログ (9件) を見る

Raspberry Pi3 Model B (Element14)
- 出版社/メーカー: RASPBERRY-PI
- メディア: エレクトロニクス
- この商品を含むブログを見る
Raspberry pi 2 + リモートデスクトップ接続 + 日本語キーボード
以前、このブログでも記事にしたリモートデスクトップの続きです。
この記事を書いていた時には気にしていなかったのですが、日本語キーボードを認識してくれず、コロンやアスタリスクを入力するのが難しい状態でした。vimをよく使うのですがファイルの保存にも苦労する状況。これをなんとかしたいと思い、いつもの通り試行錯誤しました。
普通、Raspberry piでキーボードレイアウトの変更というと、raspi-configを使うように案内されています。しかし、このコマンドは、USBポートにキーボードが直接繋がっていることを想定しているようで、リモートデスクトップの接続元のキーボードをなんとかするようにはできていません。そんなわけで検索してもなかなか欲しい情報に行き当たらない…… ということになりました。
結局、xrdpの設定を変更する必要があることがわかりました。/etc/xrdpに設定ファイルがあります。km-*.iniの形式のファイルがキーボードレイアウトの設定ファイルです。中身はテキストファイルなのでmoreでも確認することができます。
pi@raspberrypi:/etc/xrdp$ ls
km-0407.ini  km-040c.ini  km-0411.ini  km-041d.ini	km-e0200411.ini  rsakeys.ini  startwm.sh
km-0409.ini  km-0410.ini  km-0419.ini  km-e0010411.ini	km-e0210411.ini  sesman.ini   xrdp.ini
pi@raspberrypi:/etc/xrdp$
これに気がついて検索してみると、すでに同じような問題を対処されていることがありました。英語のキーボードでの相談ですが、USキーボードで対処されている方。さらに探してみるとUbuntu Linuxですが
Ubuntu日本語フォーラム / xrdpで日本語キーボードが使えないこちらの方。
最終的にはこのリンクで相談されている方法で解決しました。まずはキーボードレイアウトを入手。
pi@raspberrypi:/tmp$ wget http://www.mail-archive.com/xrdp-devel@lists.sourceforge.net/msg00263/km-e0010411.ini
--2016-04-03 10:37:30--  http://www.mail-archive.com/xrdp-devel@lists.sourceforge.net/msg00263/km-e0010411.ini
www.mail-archive.com (www.mail-archive.com) をDNSに問いあわせています... 72.52.77.8
www.mail-archive.com (www.mail-archive.com)|72.52.77.8|:80 に接続しています... 接続しました。
HTTP による接続要求を送信しました、応答を待っています... 200 OK
長さ: 8703 (8.5K) [text/plain]
`km-e0010411.ini' に保存中

100%[============================================================================================================>] 8,703       --.-K/s 時間 0.01s

2016-04-03 10:37:30 (890 KB/s) - `km-e0010411.ini' へ保存完了 [8703/8703]

pi@raspberrypi:/tmp$
そのあとは/etc/xrdpに保存して、xrdpを再起動でした。シンボリックリンクを作成したりするあたりはどうしてなのか実はわかっていませんが、教えられた通りということにしています。
pi@raspberrypi:/tmp$ ls
MathLink  km-e0010411.ini  pulse-PKdhtXMmr18n  ssh-4YIg1PSuF9UV  ssh-es58Vta1Dl5O  wpa_ctrl_1822-1
pi@raspberrypi:/tmp$ cd /etc/xrdp/
pi@raspberrypi:/etc/xrdp$ ls
km-0407.ini  km-0409.ini  km-040c.ini  km-0410.ini  km-0419.ini  km-041d.ini  rsakeys.ini  sesman.ini  startwm.sh  xrdp.ini
pi@raspberrypi:/etc/xrdp$ sudo mv /tmp/km-e0010411.ini km-0411.ini
pi@raspberrypi:/etc/xrdp$ chmod 644 km-0411.ini
pi@raspberrypi:/etc/xrdp$ sudo ln -s km-0411.ini km-e0010411.ini
pi@raspberrypi:/etc/xrdp$ sudo ln -s km-0411.ini km-e0200411.ini
pi@raspberrypi:/etc/xrdp$ sudo ln -s km-0411.ini km-e0210411.ini
pi@raspberrypi:/etc/xrdp$ sudo /etc/init.d/xrdp restart
[ ok ] Stopping RDP Session manager : sesman xrdp.
[ ok ] Starting Remote Desktop Protocol server : xrdp sesman.
pi@raspberrypi:/etc/xrdp$
これで無事リモートデスクトップを使いながら日本語キーボードが使えるという状況になりました。めでたしめでたし。

Raspberry Pi3 Model B (Element14)
- 出版社/メーカー: RASPBERRY-PI
- メディア: エレクトロニクス
- この商品を含むブログを見る
Raspberry pi + gamepad (XBOXコンントローラー)
xboxのコントローラを持っているのですが、これをRaspberry piにUSB接続して、ゲームパッドとして認識させるところを試してみます。もともとPCでゲームを遊ぶ時に使っているものなのですが、これで何か遊べないかなぁということで……

マイクロソフト Xbox One ワイヤレスコントローラー(Xbox One/Windows PC対応)7MN-00005
- 出版社/メーカー: マイクロソフト
- 発売日: 2014/11/14
- メディア: Personal Computers
- この商品を含むブログ (1件) を見る
実を言うと全然難しくなくて、ただつなぐだけで認識しました。lsusbコマンドで認識しているかどうか確認することができます。5行目に表示されていますね。
pi@raspberrypi:~$ lsusb
Bus 001 Device 002: ID 0424:9514 Standard Microsystems Corp.
Bus 001 Device 001: ID 1d6b:0002 Linux Foundation 2.0 root hub
Bus 001 Device 003: ID 0424:ec00 Standard Microsystems Corp.
Bus 001 Device 004: ID 056e:4008 Elecom Co., Ltd
Bus 001 Device 005: ID 045e:02d1 Microsoft Corp.
pi@raspberrypi:~$
むやみに長くてすみませんがデバイスの詳細。詳細にアクセスするにはsudoコマンドを使ってスーパーユーザー権限を使う必要があります。
pi@raspberrypi:~/gamepad$ sudo lsusb -v -s 005

Bus 001 Device 005: ID 045e:02d1 Microsoft Corp.
Device Descriptor:
  bLength                18
  bDescriptorType         1
  bcdUSB               2.00
  bDeviceClass          255 Vendor Specific Class
  bDeviceSubClass        71
  bDeviceProtocol       208
  bMaxPacketSize0        64
  idVendor           0x045e Microsoft Corp.
  idProduct          0x02d1
  bcdDevice            1.01
  iManufacturer           1 Microsoft
  iProduct                2 Controller
  iSerial                 3 7EED83246AAF
  bNumConfigurations      1
  Configuration Descriptor:
    bLength                 9
    bDescriptorType         2
    wTotalLength           96
    bNumInterfaces          3
    bConfigurationValue     1
    iConfiguration          0
    bmAttributes         0xa0
      (Bus Powered)
      Remote Wakeup
    MaxPower              500mA
    Interface Descriptor:
      bLength                 9
      bDescriptorType         4
      bInterfaceNumber        0
      bAlternateSetting       0
      bNumEndpoints           2
      bInterfaceClass       255 Vendor Specific Class
      bInterfaceSubClass     71
      bInterfaceProtocol    208
      iInterface              0
      Endpoint Descriptor:
        bLength                 7
        bDescriptorType         5
        bEndpointAddress     0x01  EP 1 OUT
        bmAttributes            3
          Transfer Type            Interrupt
          Synch Type               None
          Usage Type               Data
        wMaxPacketSize     0x0040  1x 64 bytes
        bInterval               4
      Endpoint Descriptor:
        bLength                 7
        bDescriptorType         5
        bEndpointAddress     0x81  EP 1 IN
        bmAttributes            3
          Transfer Type            Interrupt
          Synch Type               None
          Usage Type               Data
        wMaxPacketSize     0x0040  1x 64 bytes
        bInterval               4
    Interface Descriptor:
      bLength                 9
      bDescriptorType         4
      bInterfaceNumber        1
      bAlternateSetting       0
      bNumEndpoints           0
      bInterfaceClass       255 Vendor Specific Class
      bInterfaceSubClass     71
      bInterfaceProtocol    208
      iInterface              0
    Interface Descriptor:
      bLength                 9
      bDescriptorType         4
      bInterfaceNumber        1
      bAlternateSetting       1
      bNumEndpoints           2
      bInterfaceClass       255 Vendor Specific Class
      bInterfaceSubClass     71
      bInterfaceProtocol    208
      iInterface              0
      Endpoint Descriptor:
        bLength                 7
        bDescriptorType         5
        bEndpointAddress     0x02  EP 2 OUT
        bmAttributes            1
          Transfer Type            Isochronous
          Synch Type               None
          Usage Type               Data
        wMaxPacketSize     0x00e4  1x 228 bytes
        bInterval               1
      Endpoint Descriptor:
        bLength                 7
        bDescriptorType         5
        bEndpointAddress     0x82  EP 2 IN
        bmAttributes            1
          Transfer Type            Isochronous
          Synch Type               None
          Usage Type               Data
        wMaxPacketSize     0x00e4  1x 228 bytes
        bInterval               1
    Interface Descriptor:
      bLength                 9
      bDescriptorType         4
      bInterfaceNumber        2
      bAlternateSetting       0
      bNumEndpoints           0
      bInterfaceClass       255 Vendor Specific Class
      bInterfaceSubClass     71
      bInterfaceProtocol    208
      iInterface              0
    Interface Descriptor:
      bLength                 9
      bDescriptorType         4
      bInterfaceNumber        2
      bAlternateSetting       1
      bNumEndpoints           2
      bInterfaceClass       255 Vendor Specific Class
      bInterfaceSubClass     71
      bInterfaceProtocol    208
      iInterface              0
      Endpoint Descriptor:
        bLength                 7
        bDescriptorType         5
        bEndpointAddress     0x03  EP 3 OUT
        bmAttributes            2
          Transfer Type            Bulk
          Synch Type               None
          Usage Type               Data
        wMaxPacketSize     0x0040  1x 64 bytes
        bInterval               0
      Endpoint Descriptor:
        bLength                 7
        bDescriptorType         5
        bEndpointAddress     0x83  EP 3 IN
        bmAttributes            2
          Transfer Type            Bulk
          Synch Type               None
          Usage Type               Data
        wMaxPacketSize     0x0040  1x 64 bytes
        bInterval               0
Device Status:     0x0002
  (Bus Powered)
  Remote Wakeup Enabled
pi@raspberrypi:~/gamepad$ いつものようにPythonからこれを利用できるようにしたいのですが、こちらもすでにモジュールがインストールされていました。pygameというモジュールです。
pygame
しかし、このサイト、近年稀に見る見づらいレイアウトです。横スクロールしないとマニュアルドキュメントが見られません。辛抱強く読む必要がありますね。
いろいろ試行錯誤して、とりあえずゲームパッドの名称や軸の数、ボタンの数を検出するところまで作りました。
pi@raspberrypi:~/gamepad$ cat gamepad_init.py
#!/usr/bin/python
# -*- coding: utf-8 -*-
import sys
import pygame
from pygame import locals

# 初期化
pygame.init()
pygame.joystick.init()

# ゲームパッドを列挙する(複数つなぐ場合があるので)
joysticks = [pygame.joystick.Joystick(x) for x in range(pygame.joystick.get_count())]

# ゲームパッドを認識しているか?
if pygame.joystick.get_count() == 0:
	print "ゲームパッドがありません。"
	sys.exit("終了")
else:
	print "ゲームパッドが" + str(len(joysticks)) + "個見つかりました。"

# ゲームパッドを初期化
print "ゲームパッドを初期化します..."
joysticks[0].init()
print "名称:%s" % (joysticks[0].get_name())

# ゲームパッドに軸はいくつあるの? => 6軸
n_axis = joysticks[0].get_numaxes()
print "軸の数(axis):" + str(n_axis)

# ゲームパッドにボタンはいくつあるの? => 11個
n_button = joysticks[0].get_numbuttons()
print "ボタンの数(buttons):" + str(n_button)

pi@raspberrypi:~/gamepad$
実行してみるとこんな出力になります。
pi@raspberrypi:~/gamepad$ python gamepad_init.py
ゲームパッドが1個見つかりました。
ゲームパッドを初期化します...
名称:Microsoft X-Box One pad
軸の数(axis):6
ボタンの数(buttons):11
pi@raspberrypi:~/gamepad$
軸が6個?というのに少し驚いたのですが、xbox oneのコントローラは、左手の親指のスティックで2軸、右手の親指のスティックで2軸、左右の中指あたりで押すボタン(LT, RT)が無段階ボタンなのでこれで2軸ということのようです。今後もう少し細かくコントロールできるようにしていきたいと思います。

Raspberry Pi3 Model B (Element14)
- 出版社/メーカー: RASPBERRY-PI
- メディア: エレクトロニクス
- この商品を含むブログを見る
Raspberry pi 2 + word2vec(動くところまで)
word2vecというソフトウェアがあります。
Google Code Archive - Long-term storage for Google Code Project Hosting.
人工知能の研究の中で作られたソフトウェアで、Googleの作成したものです。Apache Licenseで配布されています。
膨大な量の文章を入力として、それぞれの単語の前後5語との相関関係から、単語同士の関係を200次元のベクトルで表現するものです。内容は例えばオライリーの本で紹介されています。
配布元では、この200次元のベクトルを用いることで、興味深いことができると紹介しています。例えば、
- ある単語に近い単語を推測する(France -> Spain)
- 単語同士の連想のようなものをベクトルの計算で求める(France -> Paris ならば Italy -> ? という問いにRomeと答える)
というようなものです。詳しくは多くのサイトで紹介されているので、探してみてください。本来こういった人工知能の問題は、それなりに速いCPU、豊富なメモリのマシンで動かすものですが、word2vecはそれが比較的安価なコンピューティングパワーで実現できる、という特徴を持っています。であれば、Raspberry piで動かしてみようというわけです。
ダウンロード
Google Code Archiveで配布されていますので、Subversionコマンド(svn)でダウンロードします。trunkディレクトリに必要なファイルが入ります。注目すべきはプログラムのコンパクトさです。word2vec.cはC言語で702行しかありませんからね。
pi@raspberrypi:~$ svn checkout http://word2vec.googlecode.com/svn/trunk/
A    trunk/word2phrase.c
A    trunk/LICENSE
A    trunk/word-analogy.c
A    trunk/compute-accuracy.c
A    trunk/demo-analogy.sh
A    trunk/demo-classes.sh
A    trunk/demo-train-big-model-v1.sh
A    trunk/demo-word-accuracy.sh
A    trunk/demo-phrases.sh
A    trunk/questions-words.txt
A    trunk/demo-phrase-accuracy.sh
A    trunk/demo-word.sh
A    trunk/distance.c
A    trunk/README.txt
A    trunk/questions-phrases.txt
A    trunk/word2vec.c
A    trunk/makefile
リビジョン 42 をチェックアウトしました。
pi@raspberrypi:~$
コンパイル
コンパイルにはgccが必要です。まずは普通にmakeしてみました。すると……
pi@raspberrypi:~/trunk$ make
gcc word2vec.c -o word2vec -lm -pthread -O3 -march=native -Wall -funroll-loops -Wno-unused-result
cc1: error: bad value (native) for -march switch
makefile:8: recipe for target 'word2vec' failed
make: *** [word2vec] Error 1
pi@raspberrypi:~/trunk$
コンパイルに失敗します。エラーメッセージから、どうやら-march=nativeというコンパイルオプションに問題があるようです。このオプションは搭載されているCPUに応じたコンパイルをするためのものです。しかし、このオプションがうまく機能しない場合があるようです。情報を探してみたら、以下のサイトにたどり着きました。この情報をもとに解決策を探してゆきます。
Raspberry pi 2はARM v7というプロセッサを搭載しています。これはcpuinfoで確認できます。
pi@raspberrypi:~/trunk$ cat /proc/cpuinfo
processor       : 0
model name      : ARMv7 Processor rev 5 (v7l)
BogoMIPS        : 57.60
Features        : half thumb fastmult vfp edsp neon vfpv3 tls vfpv4 idiva idivt vfpd32 lpae evtstrm
CPU implementer : 0x41
CPU architecture: 7
CPU variant     : 0x0
CPU part        : 0xc07
CPU revision    : 5
(以下だいたい同じ情報が4回(コアの数だけ)繰り返し出力される)
また、gccのオプションでも、現在の環境についてのヘルプが得られます。★のところがenabledになっているのに注目しました。
pi@raspberrypi:~/trunk$ gcc -c -Q -march=native --help=target
cc1: error: bad value (native) for -march switch
The following options are target specific:
  -mabi=
  -mabort-on-noreturn                   [disabled]
  -mandroid                             [disabled]
  -mapcs                                [disabled]
  -mapcs-float                          [disabled]
  -mapcs-frame                          [disabled]
  -mapcs-reentrant                      [disabled]
  -mapcs-stack-check                    [disabled]
  -march=                               native
  -marm★                               [enabled]
  -mbig-endian                          [disabled]
  -mbionic                              [disabled]
  -mcallee-super-interworking           [disabled]
  -mcaller-super-interworking           [disabled]
  -mcirrus-fix-invalid-insns            [disabled]
  -mcpu=
  -mfix-cortex-m3-ldrd                  [enabled]
  -mfloat-abi=                          hard
  -mfp16-format=
  -mfp=
  -mfpe                                 [disabled]
  -mfpe=
  -mfpu=                                vfp
  -mglibc                               [enabled]
  -mhard-float                          [disabled]
  -mlittle-endian                       [enabled]
  -mlong-calls                          [disabled]
  -mpic-register=
  -mpoke-function-name                  [disabled]
  -msched-prolog                        [enabled]
  -msingle-pic-base                     [disabled]
  -msoft-float                          [disabled]
  -mstructure-size-boundary=
  -mthumb                               [disabled]
  -mthumb-interwork                     [enabled]
  -mtp=
  -mtpcs-frame                          [disabled]
  -mtpcs-leaf-frame                     [disabled]
  -mtune=
  -muclibc                              [disabled]
  -mvectorize-with-neon-quad            [disabled]
  -mword-relocations                    [disabled]
  -mwords-little-endian                 [disabled]

pi@raspberrypi:~/trunk$
makefileをviで開いてCFLAGSを書き換えます。-march=nativeを消して、-marmとします。
CFLAGS = -lm -pthread -O3 -marm -Wall -funroll-loops -Wno-unused-result
これでmakeを再度実行すると、今度は成功しました。warningはでていますが、これはgccにはよくあること、ということで……
pi@raspberrypi:~/trunk$ make
gcc word2vec.c -o word2vec -lm -pthread -O3 -marm -Wall -funroll-loops -Wno-unused-result
word2vec.c: In function ‘TrainModelThread’:
word2vec.c:366:36: warning: cast from pointer to integer of different size [-Wpointer-to-int-cast]
word2vec.c:372:50: warning: cast from pointer to integer of different size [-Wpointer-to-int-cast]
word2vec.c:413:54: warning: cast from pointer to integer of different size [-Wpointer-to-int-cast]
gcc word2phrase.c -o word2phrase -lm -pthread -O3 -marm -Wall -funroll-loops -Wno-unused-result
gcc distance.c -o distance -lm -pthread -O3 -marm -Wall -funroll-loops -Wno-unused-result
distance.c: In function ‘main’:
distance.c:31:8: warning: unused variable ‘ch’ [-Wunused-variable]
gcc word-analogy.c -o word-analogy -lm -pthread -O3 -marm -Wall -funroll-loops -Wno-unused-result
word-analogy.c: In function ‘main’:
word-analogy.c:31:8: warning: unused variable ‘ch’ [-Wunused-variable]
gcc compute-accuracy.c -o compute-accuracy -lm -pthread -O3 -marm -Wall -funroll-loops -Wno-unused-result
compute-accuracy.c: In function ‘main’:
compute-accuracy.c:29:109: warning: unused variable ‘ch’ [-Wunused-variable]
chmod +x *.sh
pi@raspberrypi:~/trunk$
コンパイルに成功すると、デモンストレーション用のプログラムに実行権限が付与されます。さっそくdemo-word.shを実行してみます。これはかなり時間がかかります。何をしているのかというと、ネットから人工知能を学習させるためのまとまった量のテキストをダウンロードし、これを読み込みながら人工知能に学習させていくのです。別途vmstatコマンドでCPUとメモリの様子を観察していましたが、swapメモリまで使用してなんとか処理を終えていました。
私の環境では2時間半かかりました。Raspberry pi 2に搭載するSDカードの性能で少し必要な時間が変わることがあるかもしれません。
pi@raspberrypi:~/trunk$ ./demo-word.sh
make: Nothing to be done for 'all'.
--2016-03-12 19:10:43--  http://mattmahoney.net/dc/text8.zip
mattmahoney.net (mattmahoney.net) をDNSに問いあわせています... 98.139.135.129
mattmahoney.net (mattmahoney.net)|98.139.135.129|:80 に接続しています... 接続しました。
HTTP による接続要求を送信しました、応答を待っています... 200 OK
長さ: 31344016 (30M) [application/zip]
`text8.gz' に保存中

100%[===========================================================================>] 31,344,016   732K/s 時間 42s

2016-03-12 19:11:25 (735 KB/s) - `text8.gz' へ保存完了 [31344016/31344016]

Starting training using file text8
Vocab size: 71291
Words in train file: 16718843
Alpha: 0.000005  Progress: 100.10%  Words/thread/sec: -346.25k
real    147m4.148s
user    560m58.090s
sys     0m48.780s
Enter word or sentence (EXIT to break):
さぁ、いよいよ学習が終わり、動き始めました。長くなりますので、今回はこれまでということで。

Raspberry Pi2 Model B ボード&ケースセット (Standard, Clear)-Physical Computing Lab
- 出版社/メーカー: TechShare
- メディア: エレクトロニクス
- この商品を含むブログ (10件) を見る
Raspberry piでロボット自動車(試作品)
まだ初歩的な試作品です。サーボモータと普通のタミヤモーター+ギアを組み合わせたものですが、初走行の様子です。さて、ここからどう工夫するか……

Raspberry Piスターターパック (Pi2 用Standard)
- 出版社/メーカー: TechShare
- メディア: エレクトロニクス
- この商品を含むブログ (1件) を見る
Raspberry pi 2 + モータードライバTA7291P
さて、前回までのサーボモータに続き、今回はRaspberry pi 2で普通のモーターを制御します。モーターを回すだけなら電池とモーターを繋げてスイッチをつけるだけでラズパイの出番はないわけですが、モーターの回転速度、回転方向も含めて制御したいと思います。
モーターはアナログ回路です。例えば小さい電力ならゆっくり、大きな電力なら速く回転します。ラズパイは基本的にデジタル(5Vと0Vで1と0を表す)で動いているわけですが、サーボモーターでも使ったPWMの仕組みがあり、アナログに似た操作ができます。また、モータードライバと呼ばれるICを使えば、速度や回転方向のほか、モーターを使った時に発生するノイズによる影響も避けることができるようです。
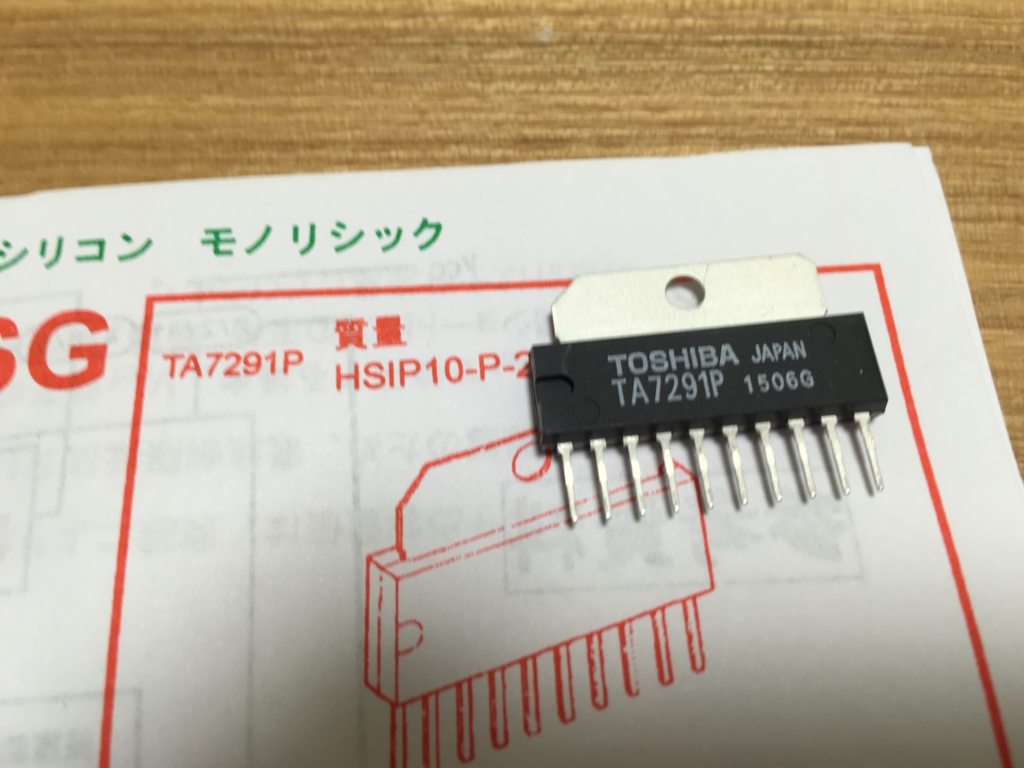
というわけで、秋月電子からモータードライバ TA7291Pを買いました。2個セットで300円。これだけだと送料のほうが高いので他にも買い物をしたのですが、それはまた別の機会に書こうと思います。

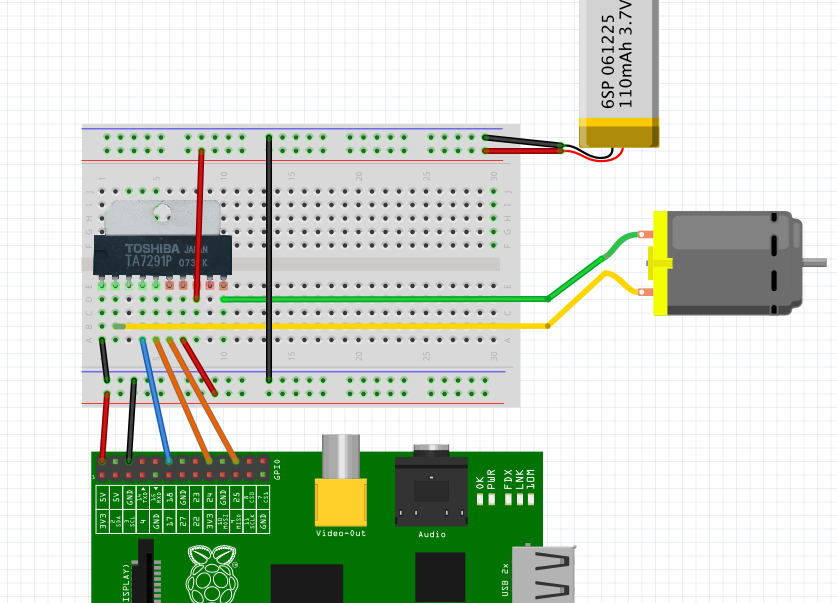
これを含めた回路は以下のFritzingで作った図の通りです。モーターの電源は前回までのブログでも紹介したモバイルバッテリーのUSBポートから線を引っ張って取得しています。図では適当なリチウム電池の絵になっています。モーター1個くらいならRaspberry piから直接取っても大丈夫かもしれませんが、この後サーボモーターも追加でつないで自動車にしたいという野望があり、安定動作のため別電源としています。

さて、配線ができたらいつもの通りPythonプログラムを書きます。ta7291クラスは文字通りモータードライバーを簡単に扱うためのクラスです。使い方はコメントに書いてありますので見てください。
pi@raspberrypi:~/work$ cat ta7291.py
#!/usr/bin/python
# -*- coding: utf-8 -*-

import RPi.GPIO as GPIO
import time
import sys

class ta7291:
	'''
	Motor driver TA7291 class
	'''
	def __init__(self, pwm, in1, in2):
		# GPIOセットアップ
		GPIO.setmode(GPIO.BCM)
		GPIO.setup(pwm, GPIO.OUT)
		GPIO.setup(in1, GPIO.OUT)
		GPIO.setup(in2, GPIO.OUT)
		# ピンを保存
		self.in1 = in1
		self.in2 = in2
		self.p = GPIO.PWM(18, 50)

	def drive(self, speed):
		'''
		モーターを回転させる。
		speed : -100から100の数値。正の数なら正回転、負の数なら逆回転。
		'''
		if speed > 0:
			GPIO.output(self.in1, 1)
			GPIO.output(self.in2, 0)
			self.p.start(speed)
		if speed < 0:
			GPIO.output(self.in1, 0)
			GPIO.output(self.in2, 1)
			self.p.start(-speed)
		if speed == 0:
			GPIO.output(self.in1, 0)
			GPIO.output(self.in2, 0)

	def brake(self):
		GPIO.output(self.in1, 1)
		GPIO.output(self.in2, 1)
		time.sleep(0.5)

	def cleanup(self):
		'''
		最後は正面に戻して終了する
		'''
		self.brake()
		GPIO.cleanup()

if __name__ == "__main__":
	pass
pi@raspberrypi:~/work$
それから、ta7291pクラスを使用するメインプログラムの方を作ります。例えば下のようなシンプルなものになります。
pi@raspberrypi:~/work$ cat motor_test.py
#!/usr/bin/python
# -*- coding: utf-8 -*-

import RPi.GPIO as GPIO
import time
import sys
import ta7291

if __name__ == "__main__":
	d = ta7291.ta7291(18, 24, 25)

	print "Normal Powerup/down..."
	for power in range(0, 100, 10):
		d.drive(power)
		time.sleep(0.3)
	for power in range(100, 0, -10):
		d.drive(power)
		time.sleep(0.3)

	print "Stop 3 seconds..."
	d.drive(0)
	time.sleep(3)

	print "Max speed 3 seconds, and stop..."
	d.drive(100)
	time.sleep(3)
	d.drive(0)
	time.sleep(3)

	print "Max speed 3 seconds, and brake..."
	d.drive(100)
	time.sleep(3)
	d.brake()
	time.sleep(3)

	d.cleanup()
さて、ここまでくれば動作可能です。モーターを動かしているところは動画にしましたので載せておきます。上でも書いたようにサーボモータを追加して、自動車のような姿にして走らせる事を目標にしていますが、ラジコンの経験もない私ですので無事走るかどうか…… 慣れないタミヤモーターをいじっていますので、動いた時にまた記事にしようと思います。

タミヤ 楽しい工作シリーズ No.189 ミニモーター低速ギヤボックス 4速 70189
- 出版社/メーカー: タミヤ
- 発売日: 2009/11/30
- メディア: おもちゃ&ホビー
- 購入: 3人 クリック: 11回
- この商品を含むブログ (2件) を見る